


![Are AI Chatbots Replacing Search Engines? AI vs Google [New Research]](https://www.orbitmedia.com/wp-content/uploads/2025/05/How-often-are-we-using-AI-chatbots_.webp)


What Are the Basic Procedures for Office and Home Wavlink Logins?
Step-by-step Wavlink login guide, set up your device quickly using wifi.wavlink.com for better Wi-Fi at home or in the office.
If you bought a Wavlink Wi-Fi extender setup or router and are now stuck on what to do with it, don't worry. If you're not very tech-savvy, the thought of setting up or getting into a network device can be a bit scary at first. The good news is that Wavlink has made it pretty easy to do, whether you're at home or at the office. Here is a guide that will show you how to log in to Wavlink with simple steps:
Step By Step Guide to Wavlink Login
Step 1: To begin, plug in and turn on your device.
It may seem clear, but let's begin at the beginning. Make sure that you have power to your. Wavlink device. Plug the range extender between your router and the spot where the Wi-Fi is weak when you're setting it up.
Give it a minute or two to fully boot up after you turn it on. Some lights should come on to let you know what's going on. Usually, flashing or steady lights mean the device is working right.
Step 2: Join the Wavlink network.
Next, get your laptop, phone, or tablet and go to the settings for your Wi-Fi. A new network like Wavlink-N or Wavlink_EXT should show up. Join that network right away.
You won't be able to connect to the internet yet, which is normal. You are just connecting to the Wavlink device straight to finish setting it up.
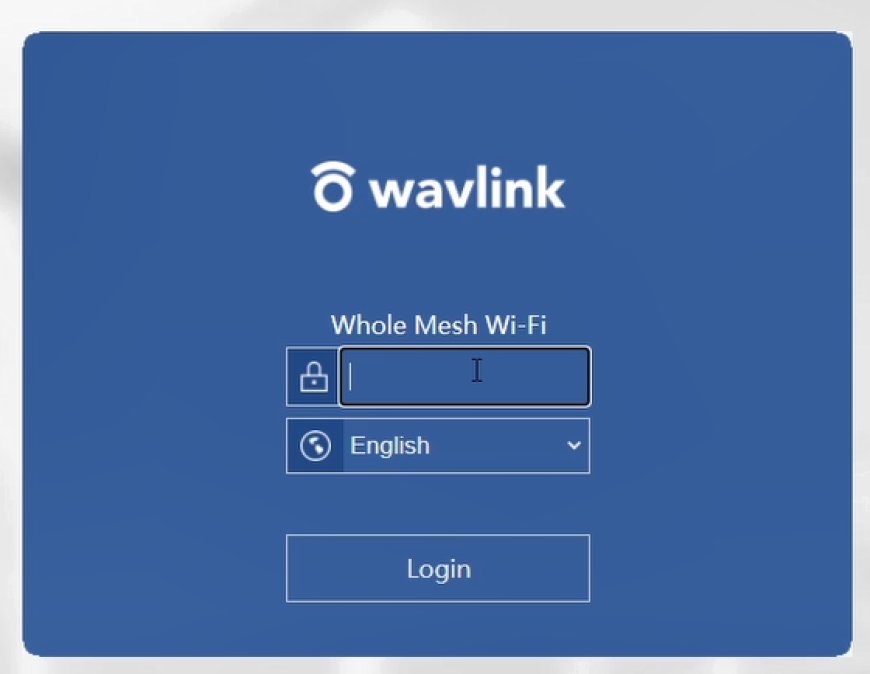
Step 3: Go to wi-fi.wavlink.com and click on the Login button.
To get to wifi.wavlink.com, open any web browser and type it in.
If you press "Enter," you should be taken to the Wavlink login page. Type in the IP address: 192.168.10.1 if that doesn't work.
It's easy to fix this part, but a lot of people get stuck here. Just make sure you're connected to the Wavlink Wi-Fi and not your main internet connection.
Step 4: Use the default credentials to log in.
There will be a screen where you enter your account and password. As long as you haven't changed them, the default passwords are: Login name: admin, password: admin.
To keep your network safe, it's best to change the password to something different after getting in. This is especially important if you're using the device at work.
Step 5: Follow the installation guide
It will walk you through the rest of the steps once you're in. When you set up the device, you can pick whether to use it as a repeater, router, or access point.
This mode works best for people who use it at home or in a small office. This helps your current Wi-Fi connection reach farther without adding anything new.
It will ask you to pick your main Wi-Fi network, enter the password for that network, and maybe give your new extended network a name. Everything is pretty simple just follow the steps.
Step 6: Check the settings and restart
the device will normally restart itself after you're done with the steps. It only takes a minute or two. You should be able to see your extended Wi-Fi network in the list of links once it's back online.
It should work after you connect your devices. You should no longer have any problems with a weak signal after that.
Bonus Tips for Smooth Setup
Stay close to the device during setup: If you're too far away, the signal may drop and interrupt the process.
Write down your login details: Keep a record of your Wavlink login info and new network name/password just in case.
Use the browser’s private/incognito mode if the login page isn’t loading properly this can help clear old cached data.
Final Thoughts
Setting up your Wavlink device, whether at home or in the office doesn’t have to be a stressful experience. With just a few steps, you can log in through wifi.wavlink.com, complete the Wavlink setup, and start enjoying stronger, more reliable Wi-Fi coverage in the poor spots that need it the most.
It might take a little patience the first time, but once you get it going, it’s smooth sailing. And once you’ve done it once, you’ll feel way more confident doing it again, if needed.
So if you’re still battling dead zones or slow connections, this might just be the easiest fix you’ll find.