


![https //g.co/recover for help [1-866-719-1006]](https://newsquo.com/uploads/images/202506/image_430x256_684949454da3e.jpg)


![How Smart PMs Scale Their Careers in Any Org [TPG Live Recap]](https://tpgblog.com/wp-content/uploads/2025/06/2025-06-12-thumbnail-action.png?#)


How to Configure WiFi Range Extender via www.mywifiext.net
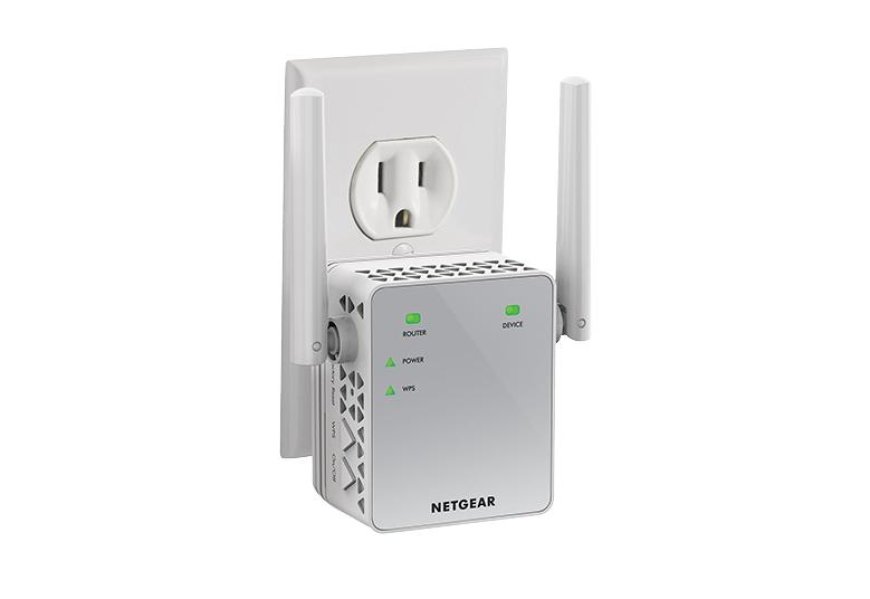
How to combat weak WiFi Signals in nooks & corners of you home? The answer is a WiFi Range Extender. It strengthens your current network to provide consistent, robust internet connection in every room. The leading brand that is known for its high performance & key features is none other than the Netgear WiFi Range Extender.
This article is an answer to your query: how to set up Netgear WiFi Extender via www.mywifiext.net. This particular URL is the official installation site to setup Netgear extenders. This step-by-step tutorial turns complicated procedures into simplified instructions to easily setup extenders.
What is mywifiext?
Let's define mywifiext prior to diving into the setup methods.
Setting up a Netgear WiFi extender does not involve using any conventional website, instead the company has designed a specific web interface to configure the device. It is called the internal setup wizard of the extender through a local web address— www.mywifiext.net. Please note that this particular setup web interface is a local URL that works on local network not internet. For Apple devices like Macs 7 iPhones, the local setup URL is mywifiext.local.
Visiting this address without being linked to your extension will probably result in an error page. Access this web interface only after connecting your smart gadget to extender’s network otherwise the page will not open.
Step-by-Step Netgear WiFi Extender Setup via mywifiext.net
Step 1: Power ON WiFi Extender
Begin by connecting your Netgear extender to a power outlet halfway between your router and the location with poor WiFi service. Wait until the Power LED becomes solid green. Should it not, hit the Power button.
Step 2: Extender Network Connection
On your laptop, tablet, or smartphone, go to the WiFi settings and connect to the extender’s default network. It may look something like NETGEAR_EXT. You won’t have internet access yet, and that’s expected at this stage.
Step 3: Access www.mywifiext.net
Open a web browser such as Chrome, Safari, or Firefox and enter www.mywifiext.net into the address bar (not the search bar). If you have a Mac, write mywifiext.local instead.
This will start the Netgear extender configuration tool. Should you get an error notice, verify your connection to the extender's network.
Step 4: Sign Up If Required
For a few Netgear models, you would require to either signup or login to account using existing credentials. This step helps secure your extender. Follow the on-screen prompts to proceed.
Step 5: Choose Setup Option
You'll typically be given two options:
- WiFi Range Extender
- Access Point
Select WiFi Range Extender if you want to increase your present WiFi signal. Most of the time, the Access Point mode is for Ethernet direct wiring to your router.
Step 6: WiFi Network Selection
Next, the extender will scan for nearby networks. Select your existing WiFi network from the list, and enter your WiFi password. This connects the extender to your main router.
Step 7: Customize the Extended Network
After connecting to your main network, you can name your extended network (SSID). You can keep it similar to your current network name, just add something like "_EXT" so you can tell the difference.
For example:
- Main WiFi: Home Network
- Extended WiFi: Home Network_EXT
Set a password for the extended network—ideally the same as your main WiFi password for simplicity.
Step 8: Finalize Setup
Click Finish or Apply, and give your extender a moment to reboot. Once it does, the new extended network will be available in your WiFi settings.
Step 9: Connect Your Devices
Return to the WiFi settings on your device and link to the new wide WiFi network. You should now have a significantly stronger signal in the formerly weak parts of your home or office.
Tips To Troubleshoot
Though the Netgear WiFi Extender Setup procedure is meant to be very easy & simplified, but you might get stuck. Here are several fast tips to save your day:
· Unable to reach www.mywifiext.net?
Before attempting again, be sure you are linked to the extender's network (e.g., NETGEAR_EXT).
- Using a Mac or iOS Device?
Try visiting mywifiext.local instead of the .net version. - Extender Not Detecting Network?
Move it closer to your router during the setup, then relocate it afterward. - Weak Signal Still?
Try relocating the extender slightly—closer to the middle point between your router and the dead zone.
Wrapping Up
That's all! Using www.mywifiext.net, you have effectively configured your Netgear WiFi Range Extender. Stronger WiFi coverage in your area will enable you to experience better browsing, more seamless streaming, and less network issues.
Keep in mind that the main actions are connecting to your extender's default network, getting to the setup page via mywifiext (or mywifiext.local), and then following the suggested procedure. It's efficient, simple to use, and can significantly improve your daily internet interaction.
Need help again? You can always revisit this guide or explore Netgear’s official support pages for additional tips.